Fab's AutoBackup forums
Bienvenue sur les forums de support technique de Fab's AutoBackup
You are not logged in.
- Topics: Active | Unanswered
Announcement
Due to a large amount of fake accounts registrations for advertising purpose (spam), this forum does not accept new registrations any longer.
You can still browse existing threads to find the help you are looking for. If you do not find it and have questions, please use this contact form.
====================================
En raison d'un nombre important d'enregistrements de faux comptes utilisateurs à des fins de spam (publicité non sollicitée), il n'est désormais plus possible de s'enregistrer sur les forums de support technique.
Vous pouvez toujours parcourir les sujets existants pour trouver ce que vous recherchez. Si vous ne trouvez pas l'information et avez des questions, veuillez utiliser ce formulaire de contact.
#1 2014-06-02 09:01:07
- Fab
- Administrator
- Registered: 2011-05-11
- Posts: 1,311
[DEPRECATED] Make a Win10PESE disk including Fab's AutoBackup 6 Pro
Win10PE SE is a Windows 10 based rescue environment. This is a procedure showing how to make your own PE environment easily including Fab's AutoBackup 6 Pro.
This tutorial has been made under Windows 10 Pro x64. It should work with Vista, 7, 8.X and others 10 builds too.
Fab's AutoBackup 6 Pro screen shot running under Win10PESE :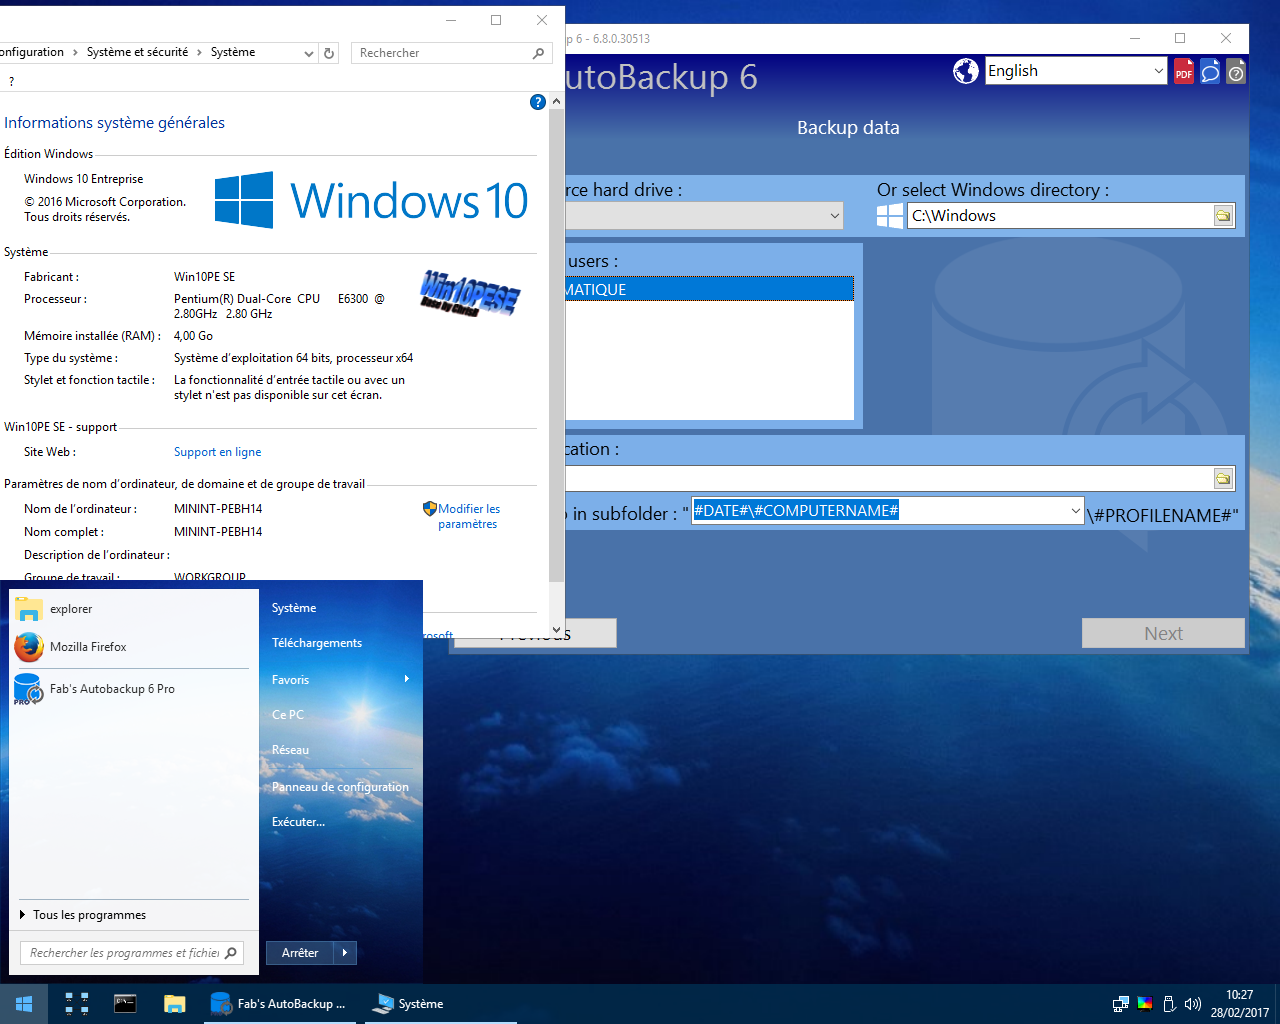
What you need :
- A computer running Windows Vista/7/8.X/10 32 or 64 bit.
- A genuine Windows 10 32 or 64 bit DVD or ISO file (a real one, not a proprietary restoration medium shipped with your computer). If you need to boot branded Windows 10 OEM computers with secure boot enabled, 64 bit version is recommended. If you do not have one, you can get a copy using Windows ISO Downloader.
- At least 8 GB free on your hard drive.
- Fab's AutoBackup 6 Pro (You have to buy and download it in a first place)
In this tutorial, the used Drive will be E and the Windows 10 used for build 64bit.
Step 1 :
Download Win10PE SE from this page :
http://win10se.cwcodes.net/Compressed/index.php
Step 2:
Extract the files to E:\ drive and rename the folder from E:\Win10PE_SE_20XX-MM-DD to E:\Win10PE_SE (this is optional).
Step 3 :
Download the Fab's AutoBackup 6 Pro Win10PE SE script (right-click the link and select save target as).
Step 4 :
Save it folder "E:\Win10PE_SE\Projects\Win10PESE\Apps\System Tools"
Step 5 :
Create a "E:\SourceWin10x64" folder and copy the Windows 10 DVD content inside
Step 6 :
Run "E:\Win10PE_SE\BuilderSE.exe"
Step 7 :
Select the "Config Source folder" in the left tree view :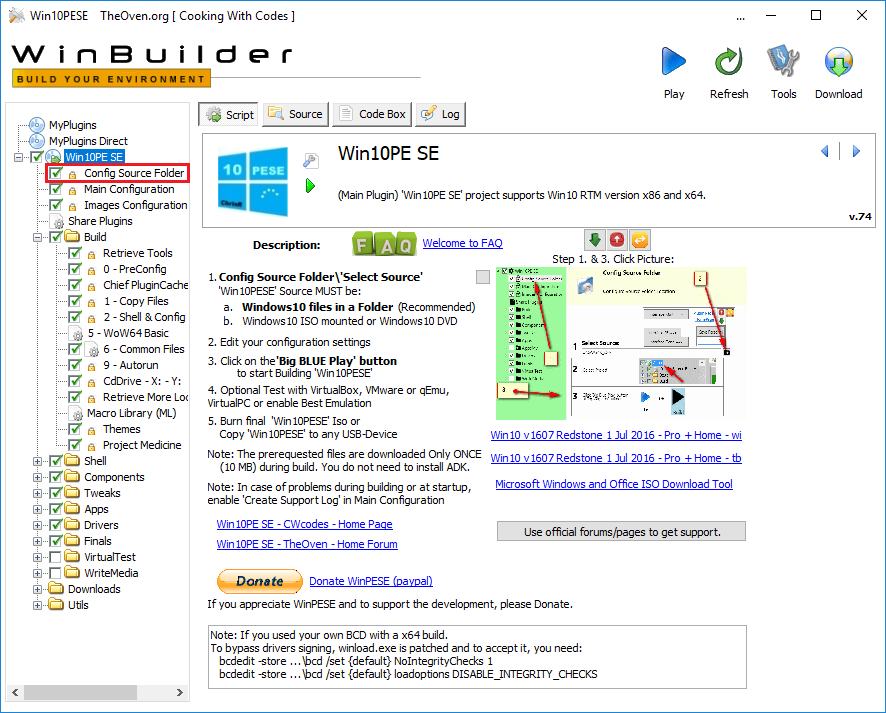
Step 8 :
Specify the Windows 10 files path ("E:\SourceWin10x64") with this button (path field number 1) :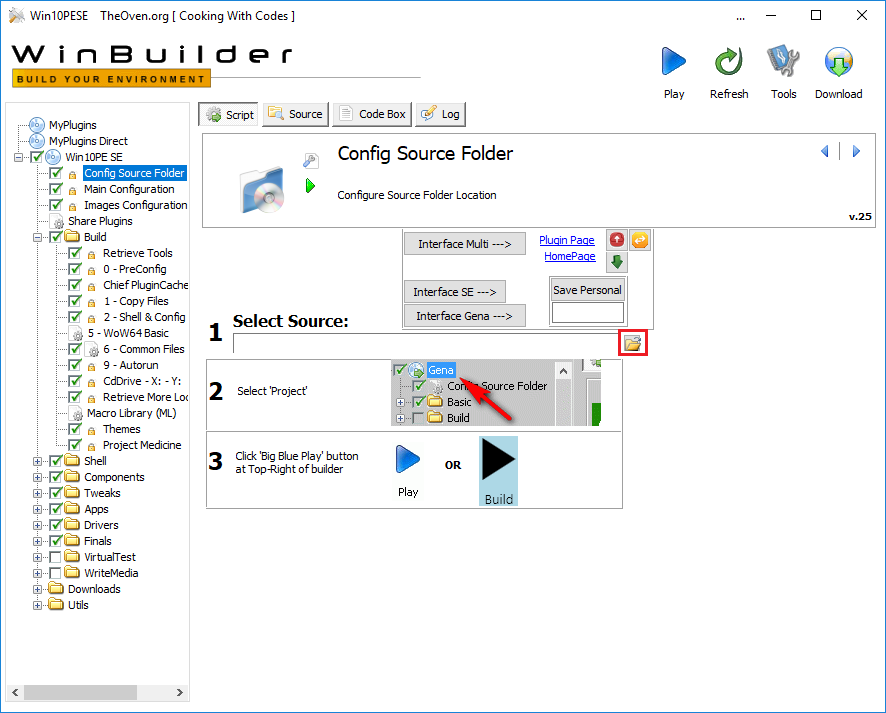
Step 9 :
Using the tree view on the left, select "Fab's AutoBackup 6 Pro (Official plugin in English)" under "Win10PESE\Apps\System Tools" and check its box.
Step 10 :
Specify the Fab's AutoBackup 6 Pro folder using this button :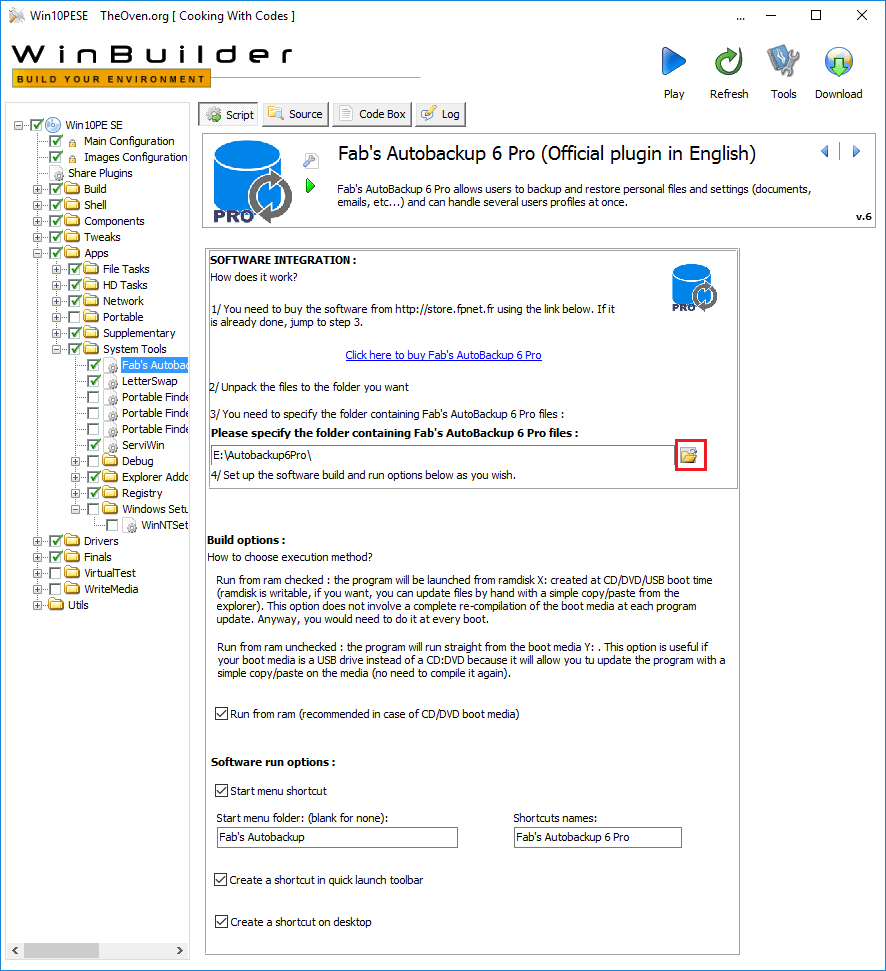
Optional but recommended: Fab's AutoBackup 6 Pro should have been started at least once, the the Order ID and email address fields filled (you can find them on your order process receipt you got by email) and EULA (End user License Agreement) accepted. This will be saved in a configuration file that will be include to you PE build and avoid it from asking such information at each start.
Step 11 :
Specify the build and run options.
Step 12 :
Build the Win10PE SE ISO using the big Play button on the right corner :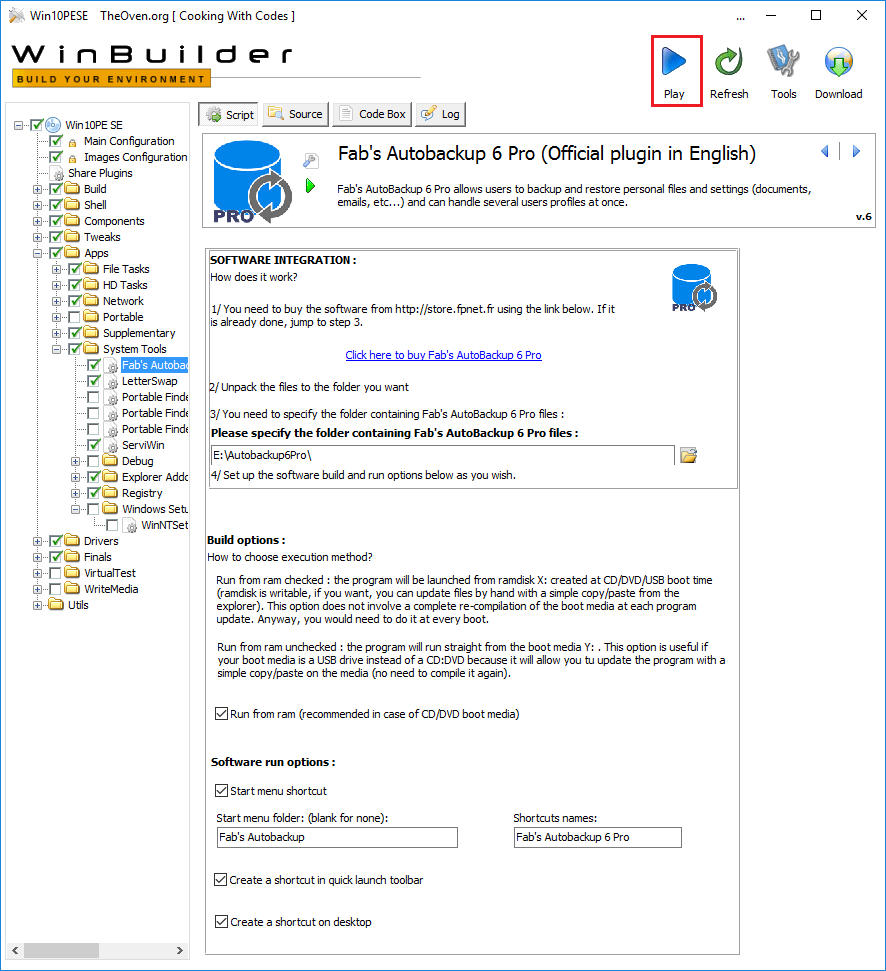
Step 13 :
Burn the "Win10PESE_x64.ISO" or (Win10PESE_x86.ISO if you used a 32bit Windows 10 media) file inside the "E:\WIN10PE_SE\ISO" to a blank medium with you favorite CD/DVD burning software.
Step 14 (if you want to create a bootable USB drive instead of burning a CD/DVD):
- Download Rufus tool and save it to your E:\Win10PE_SE folder (or anywhere else, that is up to you).
- Plug a USB drive in your computer (a fast one if possible).
- Run The Rufus tool
- If you have only one USB flash drive plugged, it will recognize it automatically. Otherwise, select it in the drop down menu: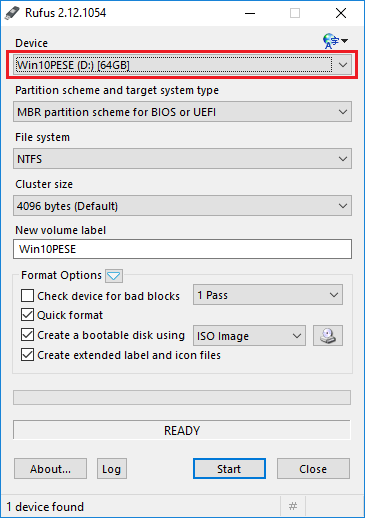
- If you are using a USB hard drive or a SSD, it will not show up automatically in this program. Click the "Format options" down arrow button and check the List USB Hard Drives box, then select it in the "Device" drop down menu.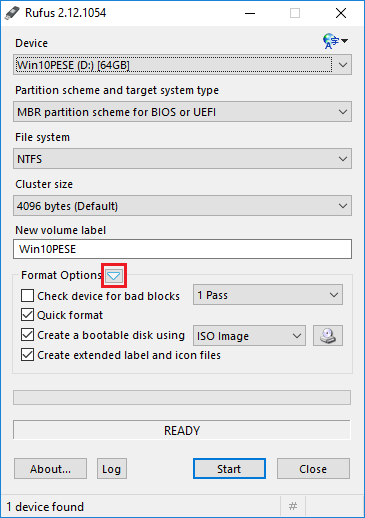
- If this boot media will be used to store backups, it is highly recommended to use NTFS file system instead of Fat32 because it can handle files larger than 4 GB. If you are using a hard drive/SSD, NTFS is the best option anyway.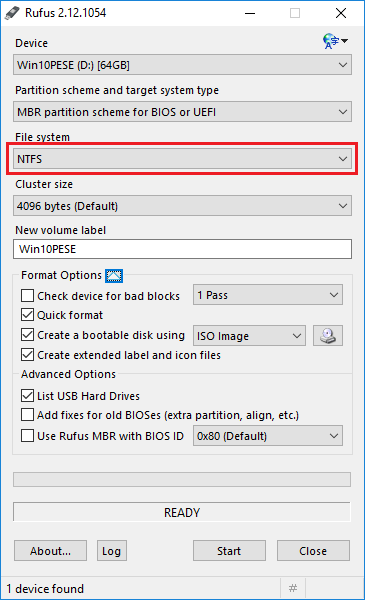
- Click the CD-Rom drive icon to select your ISO file and click "Start". This will format the drive and copy the Win10PE_SE on it.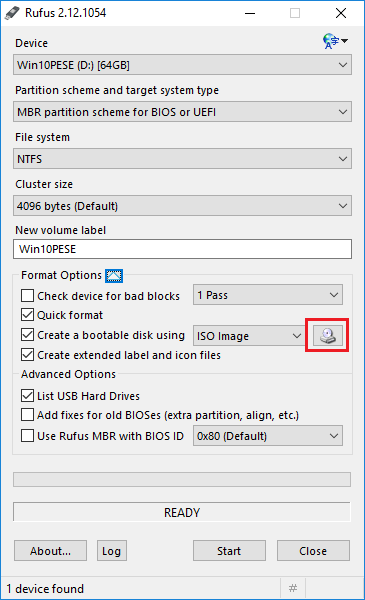
- Click the close button at the end of the process.
Step 15 (still in case you build a USB boot media but optional):
- After USB boot drive has been made, Fab's AutoBackup 6 Pro is functional but not complete as some stuff is missing like some language files, the SumatraPDF reader for the user's manual and the updater tool. To fix this, delete any file and folder in the X:\Programs\AutoBackup6Pro (where X is the USB drive letter) and copy the full content of your "E:\Autobackup6Pro" folder in it.
This way, you have a fully functional Fab's AutoBackup 6 Pro on your USB boot media that will be easy to update without the need of building another PE again.
That is it. You now have a Windows 10 rescue boot CD or USB drive including Fab's AutoBackup 6 Pro.
Fab
Offline
#2 2014-08-16 17:49:49
- happycat
- Member
- Registered: 2014-08-16
- Posts: 4
Re: [DEPRECATED] Make a Win10PESE disk including Fab's AutoBackup 6 Pro
Why would we need to boot from a pre-installation enviroment for a migration? Maybe I'm overlooking the obvious here (I'm sure I am) but isn't the point to have Windows already installed and activated?
Offline
#3 2014-08-16 18:49:28
- Fab
- Administrator
- Registered: 2011-05-11
- Posts: 1,311
Re: [DEPRECATED] Make a Win10PESE disk including Fab's AutoBackup 6 Pro
Why would we need to boot from a pre-installation enviroment for a migration? Maybe I'm overlooking the obvious here (I'm sure I am) but isn't the point to have Windows already installed and activated?
That feature is useful for technicians who have to get data from unbootable hard drives in order to restore them after Windows is reinstalled. That is just an example.
Fab
Offline
- Registered users online in this topic: 0, guests: 1
- [Bot] ClaudeBot
[ Generated in 0.021 seconds, 9 queries executed - Memory usage: 1.55 MiB (Peak: 1.66 MiB) ]